Draft
Taper the walls of a part so it lets go of a mould, such as 3° to 5° for a vacuum-forming mould.
- Draft D AdvancedPart workspace toolbar
- Draft analysis AdvancedPart workspace toolbar, at the right
| SchoolCAD | Onshape | Fusion | SOLIDWORKS |
|---|---|---|---|
| Draft | Draft | Draft | Draft |
| Draft analysis | Draft analysis | – | Draft Analysis |
Draft leans the walls of a part in a little as they rise, so it can come out of a mould. A vacuum-formed sheet grips a mould with straight walls, and a casting sticks in a mould with straight sides. With a few degrees of draft, they come off cleanly. The base face (the Neutral plane: the face the part stands on) keeps its size, and every wall square to it leans in.
In Standard, find Draft with Search tools (` or Alt+C), or switch to Advanced at the end of the toolbar.
How to use it#
- Model the mould with straight walls, for example an extruded block with rounded corners.
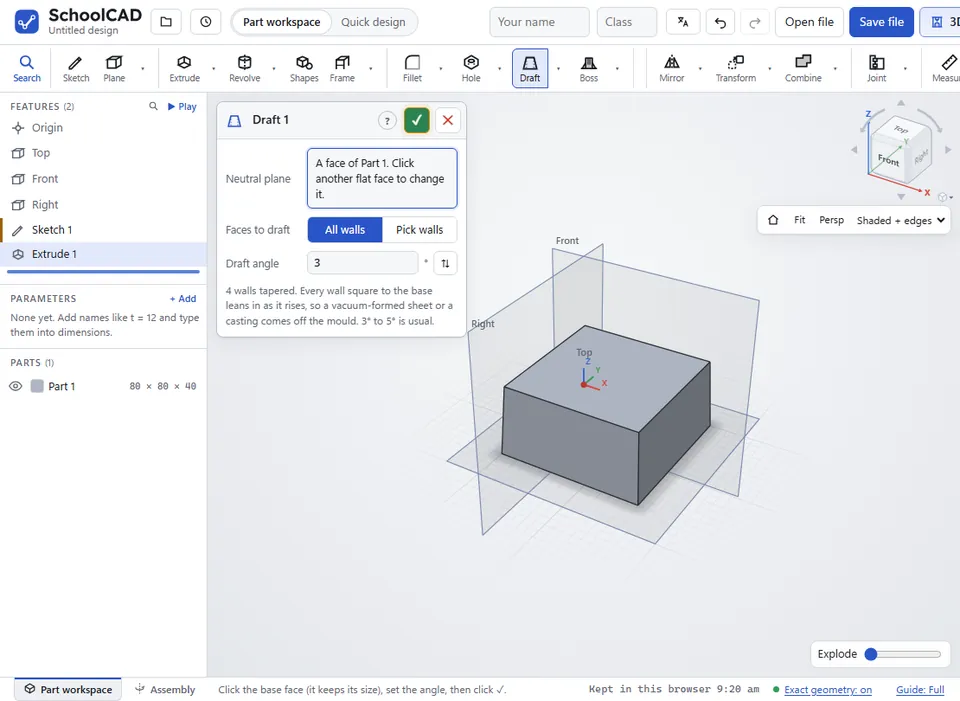
- Click Draft, or press D. The bottom face of the newest part is picked as the Neutral plane.
- If the Neutral plane is wrong, click the flat face the part stands on.
- To taper only some walls, choose Pick walls under Faces to draft and click them (click one again to take it away). All walls tapers every wall square to the base.
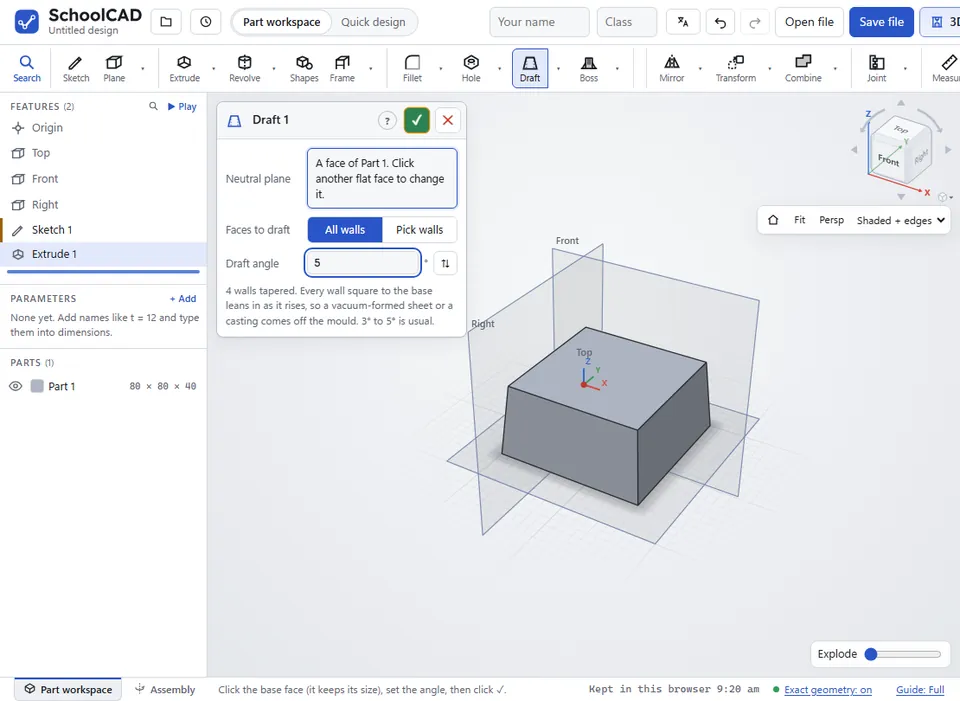
- Type the Draft angle. 3° to 5° is usual for vacuum forming.
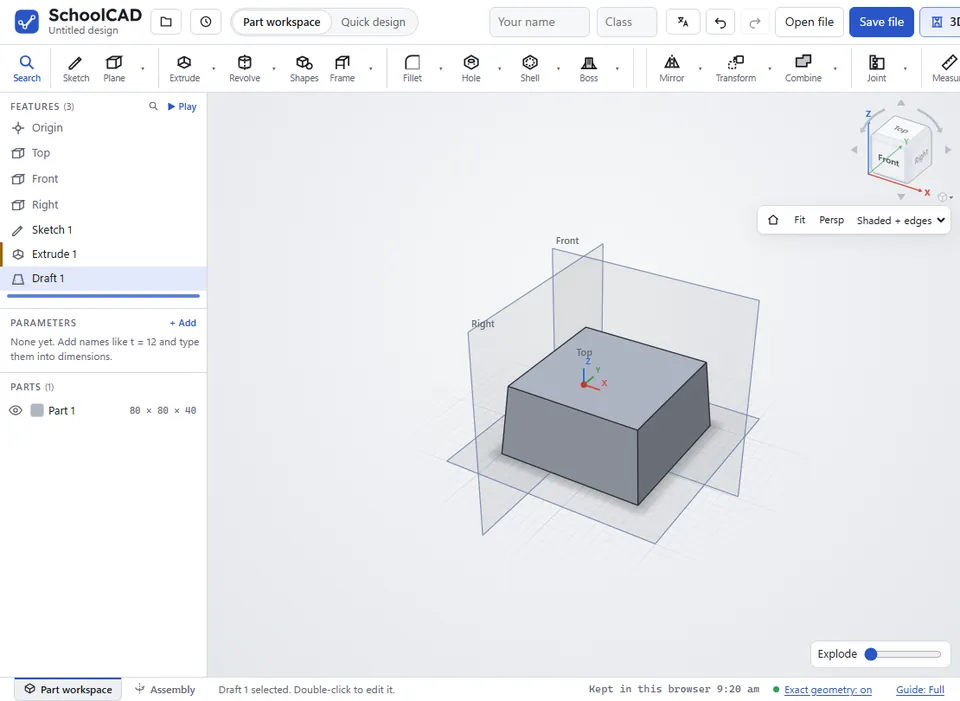
- Check the preview, then click ✓ or press Enter.
Step by step#
Here is the whole thing on a vacuum forming mould, from the SchoolCAD video tutorial.
5.
Options#
- Neutral plane: the base face, the flat face the part stands on. It keeps its size. Click another flat face to change it.
- Faces to draft (Onshape: Draft faces · SOLIDWORKS: Faces to Draft): All walls, or Pick walls and click the walls to taper. The walls picked light up. Clear takes them all away. A picked face must stand straight up from the base.
- Draft angle: how far the walls lean in, in degrees. Keep it under 30°.
- ⇅ (Opposite direction): the walls lean out instead, so the top is bigger than the base, as with Reverse direction in SOLIDWORKS. A negative angle does the same.
Draft analysis#
To see which faces will come off the mould before you add a draft, use Draft analysis (in Advanced, in the Measure ▾ menu; Onshape: Draft analysis · SOLIDWORKS: Draft Analysis). It colours every face:
| Colour | Means |
|---|---|
| Green: Positive draft | It faces the way the mould is pulled by at least the Draft angle, so it comes out cleanly. |
| Yellow: Requires draft | A wall closer to the pull direction than the draft angle: it will drag or stick. Add a Draft. |
| Red: Negative draft | It faces away from the pull: an undercut that locks the part in the mould. The base the part stands on is red too, and that is fine. |
Choose the Pull direction (X, Y or Z, and ⇅ to turn it round; Z is straight up off the base) and the Draft angle you need, such as 3. The panel says how much of the parts is each colour. Close it with ✕, or click Draft analysis again.
Tips#
- Every wall square to the base is tapered: flat walls, curved walls and rounded corners. The line under the angle says how many walls were tapered.
- Draft needs the 3D engine. It starts by itself the first time, which takes a few seconds.
- For vacuum forming, round the top edges with Fillet after the draft, so the sheet forms smoothly over them.
- To change the angle later, double-click the draft in the feature tree.
If it does not work#
- A face picked to draft is not a wall square to the base face. Pick walls that stand straight up from the base, not the top or a sloping face.
- A face to draft has gone. An earlier change took that wall away. Edit the draft and click the walls again.
- Set a draft angle (3° to 5° suits vacuum forming). The angle is 0.
- Keep the draft angle under 30°.
- This part has no walls square to that base face to taper. The base is probably a side face, or the walls already slope. Click the face the part stands on.
- A 5° draft does not work on this part. Try a smaller angle, or check the base face.
- Draft needs the 3D engine, which is not available on this computer. Try another computer or browser, or ask your teacher.
- Pick a flat face for the base. You clicked a curved face.